• Skip to primary navigation
  • Skip to content
  • Skip to primary sidebar

DSLR Video Shooter

Tutorials, Tools and Reviews for DSLR Video Shooters

  • YouTube
  • Twitter
  • Facebook
  • Instagram
  • Video GuidesLearn How to Master Video
    • Sony A7 III Guide
    • Panasonic GH5 GH5s Guide
    • Sony a6500 Guide
    • Panasonic G85 Guide
    • Corporate Video Guide
    • Sony a6300 Guide
    • Panasonic G7 Guide
    • Panasonic GH4 Guide
  • GearGear we recommend
    • Cameras
    • Lenses
    • Rigs
    • Support
    • Audio
    • Lighting
    • Accessories
  • ReviewsGear reviews
    • Camera Reviews
    • Lens Reviews
    • Slider Reviews
    • Audio Gear Reviews
    • Light Reviews
  • How ToOur tutorials
    • Custom Rigs
    • Lighting Tutorials
    • Rigs & Accessories
    • Audio Tutorials
    • Post Tutorials
  • AboutWho is Caleb?
    • About Page
    • Contact
    • Advertising
    • Copyright Information
    • Disclosures
    • Donate
  • SearchSearch the site
  • Buy Used GearWe’re selling our gear!
Home ▸ Reviews ▸ Light Reviews ▸ The Studio Part 1: Light Stands

The Studio Part 1: Light Stands

July 15, 2014 by Caleb Pike —

This is the first installment of a series of studio equipment videos I’ll be posting. In this series I will be showing you gear that I’ve been using at the new studio here in Chicago. Most of the gear in this series also gets used out in the field. You can watch the other parts here:

  • Part 1: Light Stands (You are here)
  • Part 2: Grip and Lighting Accessories
  • Part 3: How to Setup a Video Studio
  • Part 4: New Studio Lighting and Setup
  • Part 5: Basement Studio Setup

In part one, we look at light stands. I’ve had a couple old trusty stands I’ve been using for years as well as some newer stands B&H has sent me that I’ve been using a ton in the last couple months. Check out the video for my review and recommendations.

Note: Excuse the color changes in the video. FCPX has been giving me quite a lot of uploading issues.

The Stands

You will notice all of these stands are Impact stands. I love Manfrotto and Matthews gear, but I simply can’t afford to buy everything from them. Someday I’d love to have a complete Matthews grip set, but for now Impact works well. I’ve been using Impact gear since I bought my first $99 light kit 4 years ago. Some of their stuff is poorly made (as you’ll see in a later video) but you can find some really solid and affordable stuff from them. So far, all of these stands have served me well. Especially those dirt cheap $20 6′ stands.

TT-100 (Seen in video)
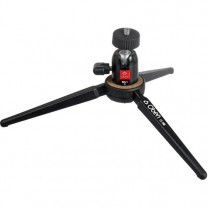
TT-100 Table Top Tripod $35

  • Includes Mini Ballhead
  • All Aluminum Construction
  • Supports Loads Up to 6 lb
  • Only 7.5″ Closed Height
  • Standard 1/4″-20 Mounting Screw

back-light-3-foot
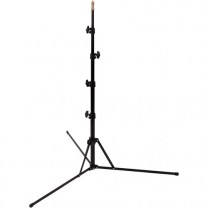
Impact 3′ Two Section Back Light Stand $25

  • Base, Riser
  • Maximum Height of 3′
  • 5/8″ Stud w/Reversible 1/4″-20 & 3/8″ Threads

impact-micro-stand
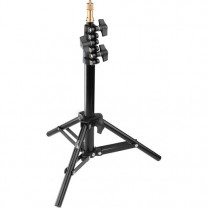
Impact 48″ LS-K4 Micro Stand $60

  • Black Anodized Aluminum Construction
  • Load Capacity: 4 lb
  • 4 Sections, 3 Risers
  • Minimum Height: 17.5″
  • Folded Length: 16″
  • 1/4″-20 Removable Threaded Top Stud

impact-reverse-leg-compact-light-stand
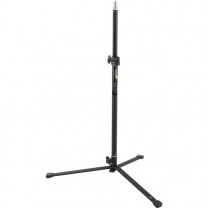
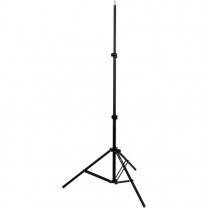
Impact LS-RL7 7.2′ Reverse Legs Light Stand $45

  • Lightweight Aluminum Construction
  • 5 Sections, 4 Risers
  • Folds Down to Only 18.9″
  • 5/8″ Top Stud with 3/8″-16 Screw
  • Includes 3/8″ to 1/4″-20 Adapter
  • Weighs only 2.2 lb

impact-6-foot-light-standImpact 6′ Stand $20

  • Minimum Height 26.3″ (66.6 cm)
  • Maximum Height 6′ (1.8 m)
  • Closed Length 26.3″ (66.6 cm)
  • Footprint Diameter 30″ (76 cm)
  • Weight 1.8 lb (820 g)
  • Maximum Load 4 lb (1.8 kg)
  • Attachment Size 5/8″ stud with 1/4″-20 thread
  • Accepts Wheels Yes
  • Air Cushioned No

impact-9-5-foot-light-stand
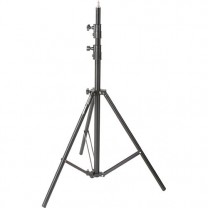
Impact 9.5′ Air-Cushioned Heavy Duty Light Stand $40

  • Three Sections
  • 5/8″ Stud with 1/4″-20 Threaded Top
  • Air-Cushioned


Quicktime File

Share this:

  • Tweet
  • Email
  • More
  • Print
  • Share on Tumblr

Recent Posts

  • Blackmagic Pocket 4K Guide Now Available!
  • Camera Setup for Filming B-Roll
  • How I Light B-Roll Shots For My Videos
  • How I Shoot B-Roll for My Videos Part 1: Backgrounds and Surfaces
  • Gear I Want to See in 2019

Reader Interactions

Comments

  1. Daniel Nienhuis says

    July 15, 2014 at 11:31 am

    Hey Caleb, nice overview. FYI, your first few lower thirds don’t have any text, just the background graphic.

  2. Billy Williams says

    July 15, 2014 at 12:16 pm

    Just an FYI that I don’t think the titles are showing for each stand! Great video, definitely going to invest in a few of these.

  3. calebpike says

    July 15, 2014 at 12:22 pm

    Thanks, FCPX has been doing funky stuff to my uploads… Looking into it.

  4. Frederico Monteiro says

    July 15, 2014 at 2:31 pm

    Caleb witch of these stands would work with the sharkS1 slider? and be portable? the heavy duty one looks nice. Again awesome Review, i was needing 3 light stands but never owned one so i know nothing about that, and again you came through. Thank you!

  5. scott800 says

    July 15, 2014 at 6:11 pm

    There are several problems with using any two impact light stands for the shark slider:

    1) The ground you are shooting is rarely level, and lightsands are fixed to the slider and cannot accommodate bending, a solution is adding a swiveling stud to one of the stands but the whole thing is hard to manage and move around.

    2) Smaller light stands dont work very well at keeping the slider stable so you need to do the heavy duty ones if you dont want to see that wobble, but have a nearly 4′ diameter footprint. They clank together and are very difficult to move around on the fly.

    3) A 1/4-20 on top of the stud makes it harder to seat the stud properly in the stand without often thinking its tight and then losing one stand the first time you move it.

    4) The light stands do not go very low to the ground so every time you want to do a dramatic low slide (using the ground or something as foreground parallax) you have to take the stands off, and use something lower like the ground or banquet chairs or small boxes.

    The solution I have found for most of the problems is the Avenger A0010 3.3′ Baby Stand with Leveling Leg. Its a heavy and awesome little stand with a leveling leg that gets as low as 18″ while being able to hold tons of weight. The downside, as with everything good, is the price tag, $150ea! The leveling leg doesn’t save you in all situations, but is a godsend vs regular light stand feet.

  6. scott800 says

    July 15, 2014 at 6:27 pm

    Another Idea I have been looking into is a telescopic foot system, where I take 4 $15 compact monopods and ball-head them to the foot rosettes, giving me telescopic slider feet for all terrain. I can’t yet recommend this, as I have not yet put it together…

  7. Aron J Anderson says

    July 15, 2014 at 8:03 pm

    It’s funny you just noticed your hair after recording started. I once filmed a whole video just to find out while editing that I had chocolate on my face. I did the whole video over again. Messy hair ok chocolate on face not ok. Great info in this video.

  8. Frederico Monteiro says

    July 15, 2014 at 10:35 pm

    Thank you very much really!! i’ve been using my tripod and it works great but it cant handle the 120cm length of the slider, and my tripod is a davis & sanford, so the lowest i can go with this tripod is about 71cm, i will look at the avenger babystand, keep us posted when you put it together :D!!

Primary Sidebar

Subscribe via Email

Get Gear

Support DSLR VS and buy gear from these affiliate links:

B&H Photo Video
Amazon

Categories

  • Articles
  • Audio Gear Reviews
  • Films
  • Camera Reviews
  • Lens Reviews
  • Slider Reviews
  • Interviews
  • Lighting Tutorials
  • Post Tutorials
  • Reviews
  • Videos

Amazon Affiliate Notice

We are a participant in the Amazon Services LLC Associates Program, an affiliate advertising program designed to provide a means for us to earn fees by linking to Amazon.com and affiliated sites.

Amazon Affiliate Notice

We are a participant in the Amazon Services LLC Associates Program, an affiliate advertising program designed to provide a means for us to earn fees by linking to Amazon.com and affiliated sites.

Many of the links on this site will direct you to Amazon products and if you order via those links, we earn a commission with no additional cost to you.

Recent Posts

  • Blackmagic Pocket 4K Guide Now Available!
  • Camera Setup for Filming B-Roll
  • How I Light B-Roll Shots For My Videos
  • How I Shoot B-Roll for My Videos Part 1: Backgrounds and Surfaces
  • Gear I Want to See in 2019

Copyright © 2019 · DSLR Video Shooter Inc

loading Cancel
Post was not sent - check your email addresses!
Email check failed, please try again
Sorry, your blog cannot share posts by email.